by Ron Hungarter
Nine times out of ten, when inspecting a home, I recommend installing proper attic ventilation, most frequently including the installation of continuous soffit vents and continuous ridge vents. My clients look at me like I am speaking a foreign language, looking confused and bewildered by my comments.
Although I no longer do professional contracting, I am in the process of renovating my own, newly purchased, 100-year-old building, for use as both my residence and my office. As part of that renovation, I too must install proper attic ventilation. So, I thought this might be a perfect opportunity to share my ventilation knowledge and experience with you.
There are two kinds of vents, inlet air vents and outlet air vents. Having only one or the other type of vent is the equivalent of having neither vent. Therefore, for proper attic / roof ventilation, both types of vents "must" be present, and in equal amounts of net free air flow.

What is net free air flow? Simple. The amount of air that can pass through the "gross" opening you create, minus the area of the screens, mesh, louvers or other blockages, that reduce that air flow, is the "net" free air flow. Each manufacturer rates their various vents by the net free air flow capacity. A basic rule-of-thumb is 1/300. For every 300 square feet of attic floor space being ventilated, one square foot (144 square inches) of net free air flow must be present in both inlet and outlet vent capacities. For areas insulated without a vapor barrier, that ratio doubles to 1/150.
For this article, I have compiled a pictorial tutorial on how to install ridge vents. And, since they say a picture is worth a thousand words, this little article will be equivalent to at least 15,000 words, but can be pictorially scanned in a few seconds. (A soffit vent article will follow shortly, since I need them, too!)
One often hears the expression, "To talk the talk, you have to walk the walk!" So, as I do my ridge vents, I will walk you through the process of installing your ridge vents.
Before we begin, here is a helpful hint: If your roof is really hot, spray it down with water periodically. The evaporation of only one gallon of water dissipates 8,265 BTUs of energy. (http://www.ecoology.com) The sheen in various photographs is from wetting down the roof, on the 90 degree day, that I was installing these vents, and is the reason the roof appears to be changing colors, and sometimes appearing to be blotchy. Note: Use a THOR® Shingle Clip to secure your hose to the roof, when not in use.
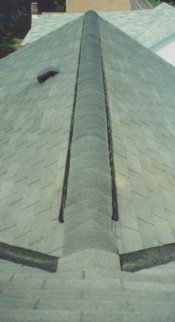
Note: The photographs are a mixture of three different sections of roof, including a 24' section over the intersecting gable roof, a 12' section over the hip roof of the garage, and a 44' section over the main gable roof. I chose the photograph most appropriate to depict each step in the ridge vent installation process, just in case you become confused about the varying backgrounds. The last three photographs are of those three, completed roof lines, respectively.
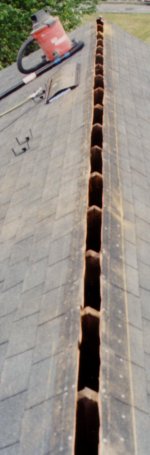
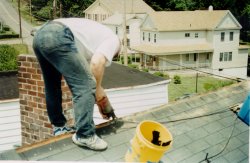
After the existing roofing caps have been removed, snap two chalk lines, marking the area on the overlapping shingles to be cut away and removed for the vent opening. This process will also mark the locations where you should then cut away the roof sheathing, allowing air flow out of the attic space.
Always try to cut the sheathing with a plumb cut, meaning that the blade should be as vertical as possible. Most manufacturer's instructions will provide the necessary dimensions of the cut size, and will tell you to use a circle saw. But, I prefer using a reciprocal saw with a bi-metal blade, which will cut through any nails I failed to remove in the cutting path. Now you have your "gross" opening cut through your roof sheathing. If you have soffit vents on your home, hot air will immediately begin to flow out of this opening, just like heat flows out of a chimney! If you do not have soffit vents, like me, only a minimal air flow will be felt. Remember, you need both types of vents to achieve the needed air flow. For something to go out, something else must come in.
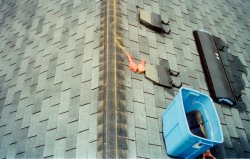
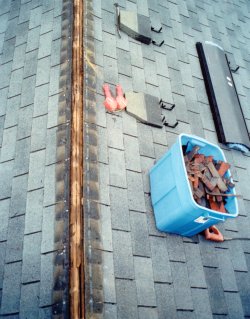
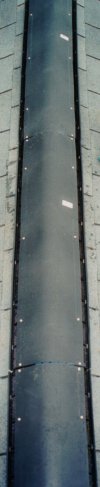
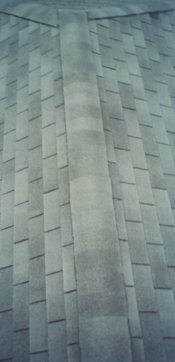
After cleaning up the roof from the sawing process, strike two more lines, marking both outside edges of the ridge vent to be installed. I am installing "Shingle Vent II" by Air VentTM. After talking with my friend Roger B. Lyle, President of R.B.L. Builders, Inc. from Mahtomedi, MN, USA, he said roofers in the heavy snow belt areas have had the fewest problems with these vents, heavy snow loads, and ice dam infiltrations. "Shingle Vent II" comes in 4' sections, 10 sections per box. Pre-drilled holes are present to accommodate the initial aligning and nailing to the roof.
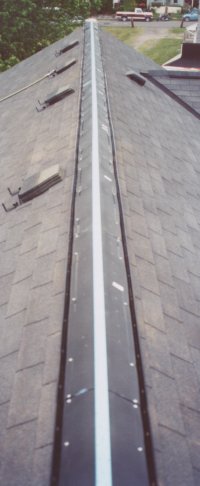
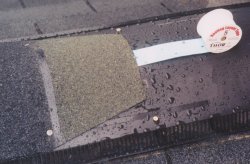
Since the caps being used are a standard 5" reveal (12" high) shingle, a standard, 5" reveal, THOR® Roofing Layout Tape was used. I simply stapled the tape to the top of the vent at one end, and then unrolled it to the other end, instantly and accurately marking the location of the caps, without any manual measurement, as quickly as I was able to unroll the Tape and staple it to the center line of the vent, about 15 seconds!
Note: The water droplets in the spool photograph are remnants of wetting down the roof with a hose, to help keep it cool enough to work on safely, and somewhat comfortably.
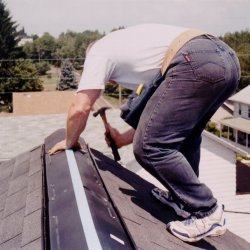
With the cap tops instantly marked by the roofing layout tape, I was ready to complete this project. I simply placed the tops of the caps on the center markings of the roofing layout tape, identifying the 5" increments, and nailed the caps in place!
Note: Always start the roofing layout tape at the end of the vent that requires you to unroll the tape "into" the direction of the prevailing wind. That trick will ensure that the caps will always be installed with the best wind resistance orientation, and least susceptible to weather infiltration.
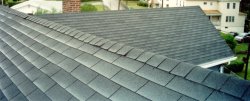
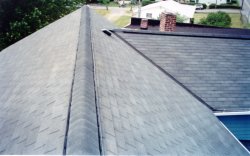
Below, left, is the 24' section of intersecting roof ridge vent; and, below, right, is the 12' garage section of ridge vent.
And finally, the 44 linear feet of newly installed ridge vent on the main roof of this 100 year old building, constructed with
individual board roof sheathing, was perfect!
Clarification: Ridge vent manufacturers recommend removing gable vents and other outlet roof vents, such as the nine-inch vents
visible in several of my photographs. Their presence interferes with, and reduces the chimney effect air flow, necessary for removing
heat and humidity from the attic / roof space. I will be removing my old, nine-inch vents.
As a postscript to this article, the unique roofing and hand tools utilized in this ridge vent installation included,
THOR® Roofing Layout Tapes;
THOR® Double Chalkers;
Magichalk®; and,
THOR® Shingle Clips.